When faced with water damage, you need effective strategies for swift resolution. From utilizing high-powered pumps for quick extraction to employing professional-grade tools like dehumidifiers and moisture meters, the top 10 tips for rapid water removal solutions can make a significant difference in mitigating the aftermath of water-related incidents. These techniques not only aid in preventing long-term damage but also play an essential role in maintaining the safety and integrity of your space.
Key Takeaways
- Use high-powered water pumps for swift water removal.
- Deploy tools like wet vacuums and dehumidifiers.
- Compare DIY vs. rental equipment for effective removal.
- Utilize air movers for quick drying.
- Conduct moisture mapping to assess the extent of damage.
Immediate Water Extraction Steps
To begin the process of immediate water extraction, swiftly deploy high-powered water pumps to quickly remove excess water from the affected area. This initial step is critical in the emergency response phase of water mitigation. Make sure that the water pumps are strategically placed to maximize efficiency and target areas of pooling water. By swiftly executing this step, you can prevent further damage to the property and minimize the risk of mold growth.
Next, assess the extent of water damage to determine the appropriate extraction equipment. Utilize specialized tools such as wet vacuums, dehumidifiers, and air movers to expedite the drying process. These tools play an important role in accelerating the water mitigation process and restoring the affected area to its pre-damage condition.
Once the excess water has been extracted, conduct a thorough inspection to identify any hidden pockets of moisture. Utilize moisture meters to detect areas with high moisture levels that may not be visible to the naked eye. Addressing these areas promptly is crucial to prevent structural damage and mold growth.
Importance of Quick Response
Swift action in response to water damage is vital to mitigate further property damage and prevent the onset of mold growth. When facing water damage, your prompt response plays a critical role in minimizing long-term consequences.
Here are some key points highlighting the importance of quick action:
Prevents Structural Damage: Acting promptly can prevent water from seeping into walls, floors, and ceilings, reducing the risk of structural damage.
Minimizes Mold Growth: Rapidly removing water inhibits the growth of mold, which can start developing within 24-48 hours of water exposure.
Preserves Belongings: Quick response helps salvage personal belongings, furniture, and other valuable items from water damage.
Reduces Cleanup Costs: Immediate action can lower the overall cleanup and restoration costs by preventing extensive damage.
Ensures Safety: Timely water removal reduces slip and fall hazards, electrical dangers, and other safety risks associated with water damage.
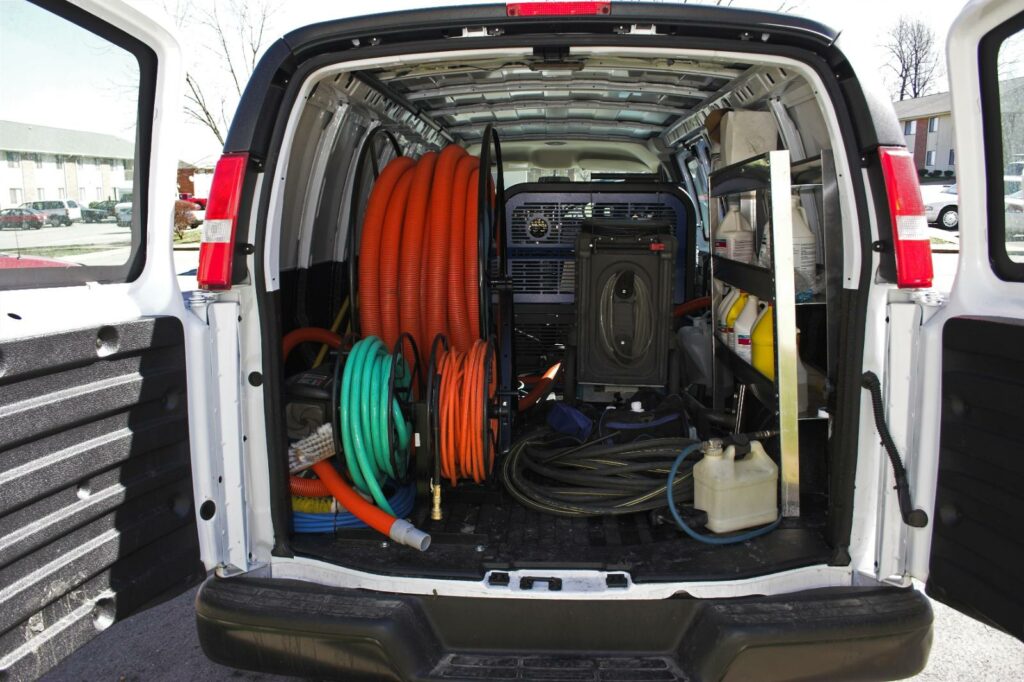
Utilize Professional Equipment
Utilize specialized equipment customized for efficient water extraction to enhance the speed and effectiveness of the removal process. When it comes to dealing with water damage, having the right tools can make all the difference. Professional equipment is designed to handle large-scale water removal quickly and thoroughly, ensuring that your space is restored promptly. Here’s a comparison between DIY solutions and rental equipment:
| DIY Solutions | Rental Equipment |
|---|---|
| Shop Vac | Water Extractor |
| Mops and Towels | Dehumidifiers |
| Buckets | Air Movers |
| Squeegees | Moisture Meters |
| Wet/Dry Vacuum | HEPA Air Scrubbers |
While DIY solutions can be helpful for minor spills or small areas, rental equipment offers more power and capacity for larger water damage incidents. Water extractors, dehumidifiers, air movers, moisture meters, and HEPA air scrubbers are essential tools that professionals use to ensure thorough water removal and prevent secondary damages like mold growth. Renting this equipment allows you to access high-quality tools without the need for a significant investment. By using professional equipment, you can expedite the water removal process and minimize the long-term effects of water damage on your property.
Assessing Water Damage Quickly
When faced with water damage, the first step is to promptly evaluate the extent of the damage to determine the necessary course of action. Damage evaluation is critical in understanding the severity of the situation and deciding on the appropriate response.
Here are some key points to ponder when appraising water damage:
Identify the Source: Locate where the water is coming from to prevent further damage and make sure it’s safe to proceed.
Check for Safety Hazards: Look out for electrical hazards, structural damage, or potential contaminants in the water that could pose risks.
Document the Damage: Take photos or videos of the affected areas for insurance purposes and track restoration efforts’ progress.
Assess the Water Category: Determine if the water is clean, gray, or black, as this will impact the cleanup process and safety precautions.
Evaluate the Affected Materials: Different materials react differently to water damage, so assess what items can be salvaged and what needs replacing.
Immediate action is crucial after evaluating the damage. It’s important to act quickly to mitigate the impact of water damage and prevent further issues.
Drying Techniques for Efficiency
To maximize efficiency in the drying process, it’s essential to employ thorough and strategic techniques customized to the specific type and extent of water damage. Effective air circulation plays a vital role in expediting the drying of wet areas. Make sure to open windows and use fans to promote airflow throughout the space. This helps in accelerating the evaporation of moisture, aiding in the drying process.
Strategic dehumidifier placement is key to enhancing the efficiency of drying techniques. Position dehumidifiers in central locations within the affected area to maximize their effectiveness. Dehumidifiers work by extracting excess moisture from the air, assisting in the overall drying process. By placing them strategically, you can target specific areas more effectively, ensuring a quicker and more thorough drying process.
Additionally, consider rotating the positioning of fans and dehumidifiers periodically to cover all areas evenly. This helps in preventing any pockets of moisture from remaining untouched, leading to a more thorough drying outcome. By combining proper air circulation with strategic dehumidifier placement, you can greatly improve the efficiency of your drying techniques and expedite the restoration process.
Preventing Mold Growth
To prevent mold growth after water damage, you should act swiftly and implement effective strategies. Quick removal of excess moisture is crucial to hinder mold development.
Mold Prevention Strategies
Implementing effective moisture control measures is essential in preventing mold growth in your environment. To ensure a mold-free space, follow these expert strategies:
Monitor Humidity Levels: Keep humidity below 60% to inhibit mold growth.
Fix Leaks Promptly: Repair any leaks in pipes, roofs, or windows to avoid excess moisture buildup.
Use Dehumidifiers: Install dehumidifiers in damp areas to reduce moisture in the air.
Enhance Ventilation: Proper air circulation is vital; use exhaust fans in bathrooms and kitchens.
Keep Surfaces Dry: Wipe down wet surfaces promptly to prevent mold from settling in.
Quick Mold Removal
Maintain vigilance in swiftly addressing mold growth to effectively prevent its spread and minimize potential health risks. Mold prevention is essential in maintaining a healthy indoor environment. Quick response is key to halting mold in its tracks.
To tackle mold promptly, begin by identifying and fixing any water leaks or sources of moisture. Mold thrives in damp environments, so ensuring proper ventilation and reducing humidity levels can inhibit its growth. If you spot any signs of mold, such as musty odors or visible patches, act promptly.
When removing mold, wear protective gear like gloves and a mask to avoid inhalation and skin contact. Scrub affected areas with a mixture of water and detergent, then thoroughly dry them. Dispose of any porous materials that are heavily infested with mold.
After cleaning, monitor the area regularly to prevent mold from reappearing. Consider investing in a dehumidifier to maintain ideal humidity levels. By taking quick and decisive action, you can effectively combat mold growth and safeguard your health.
Proper Ventilation Strategies
Consider incorporating high-powered fans and dehumidifiers in the affected area to facilitate proper ventilation and expedite the drying process. Proper ventilation plays an essential role in removing excess moisture from the air, preventing mold growth, and enhancing indoor air quality.
Here are some tips to enhance ventilation strategies:
Strategic Placement: Position fans and dehumidifiers in areas with high moisture levels to target specific spots effectively.
Cross Ventilation: Open windows and doors on opposite sides of the room to create a cross breeze that aids in drying out the space.
Ceiling Fans: Utilize ceiling fans in conjunction with other fans to circulate air more efficiently and promote faster drying.
Ventilation Ducts: Make sure that ventilation ducts are clean and unobstructed to allow for proper airflow and moisture control.
Regular Maintenance: Keep fans and dehumidifiers well-maintained to ensure efficient performance and longevity.
Monitoring Humidity Levels
To ensure effective moisture management, closely monitoring humidity levels is essential in preventing potential issues like mold growth and structural damage. By utilizing humidity monitoring tools and tracking moisture levels, you can proactively address any excess moisture before it leads to more significant problems. Here are some essential tools you can use to monitor humidity levels effectively:
| Humidity Monitoring Tools | Description | Benefits |
|---|---|---|
| Hygrometer | Measures humidity levels | Provides real-time data for quick action |
| Moisture Meters | Measures moisture content | Helps identify areas with high moisture |
| Data Loggers | Records humidity data | Offers historical trends for analysis |
Using these tools in combination with regular moisture level tracking can help you maintain ideal humidity levels in your space. High humidity levels can promote mold growth and cause structural damage, while low levels can lead to discomfort and health issues. Therefore, staying vigilant with humidity monitoring is essential for maintaining a healthy and safe environment. Remember, prevention is always better than dealing with the consequences of unchecked moisture levels.
Structural Drying Considerations
Ensure thorough and efficient drying of the structure by strategically positioning air movers and dehumidifiers to target all affected areas. When it comes to structural drying considerations, the proper placement of equipment is essential for effective moisture removal and preventing secondary damage.
Here are some key points to keep in mind:
Airflow Direction: Make sure that air movers are placed to create a cross-flow pattern, maximizing air circulation throughout the space.
Moisture Detection: Utilize moisture meters to accurately assess the moisture content of materials and determine the progress of the drying process.
Monitoring Humidity Levels: Regularly check and adjust the humidity levels in the affected area to facilitate faster drying and prevent mold growth.
Furniture and Contents: Elevate furniture and belongings off the floor to prevent further water damage and aid in the drying process.
Severe Water Damage: For extensive water damage, consider employing specialized drying techniques such as injectidry systems or tenting to expedite the drying process in challenging areas.
Follow-Up Inspection and Testing
Now that the water removal process is complete, scheduling follow-up inspections is important to confirm no moisture remains hidden.
Testing for residual moisture in key areas will help identify any lingering issues that may lead to mold or structural damage.
Conducting a thorough quality check post-drying is vital to affirm the water removal solutions’ effectiveness.
Inspection Schedule Arrangements
Following the initial water removal process, organizing a follow-up inspection and testing schedule is crucial to confirm the effectiveness of the water removal solutions implemented. To secure inspection efficiency and proper schedule coordination, consider the following tips:
Assign Responsibilities: Designate specific team members or professionals to oversee the follow-up inspections and testing procedures.
Establish A Clear Timeline: Set a detailed timeline for when follow-up inspections will occur to maintain consistency and track progress effectively.
Document Findings: Keep detailed records of each inspection, including any issues discovered and actions taken to address them.
Regular Communication: Maintain open communication channels between all parties involved to ensure everyone is informed and on the same page.
Adapt as Needed: Be flexible with the schedule and adjust inspections as necessary based on the initial findings or unexpected developments.
Testing for Residual Moisture
For effective follow-up inspection and testing after water removal, evaluating and testing for residual moisture levels is essential to ensure thorough mitigation. Utilizing moisture testing methods and equipment is vital to accurately assess the extent of moisture remaining in the affected area.
Moisture meters are commonly used tools that provide quantitative moisture content measurements in different materials such as walls, floors, and ceilings. These meters help professionals determine if further drying is required to prevent mold growth and structural damage.
In addition to moisture meters, infrared cameras can be valuable for residual moisture detection. These cameras can identify hidden pockets of moisture by detecting temperature variations in building materials. Thermal imaging helps locate areas where moisture might be trapped, ensuring a complete drying process.
When conducting follow-up inspections, combining moisture testing methods with advanced equipment like moisture meters and infrared cameras enhances the accuracy of detecting residual moisture, allowing for targeted drying efforts and preventing potential long-term issues.
Follow-Up Quality Check
Conducting a thorough follow-up quality check through inspection and testing is crucial to confirm the effectiveness of water removal efforts and to prevent any lingering moisture issues. After the initial water removal process, a follow-up evaluation ensures that all areas are thoroughly dried, minimizing the risk of mold growth and structural damage.
Here are five essential steps to include in your quality assurance inspection protocol:
Moisture Mapping: Utilize specialized equipment to identify any remaining pockets of moisture within the affected area.
Surface Testing: Conduct moisture content measurements on walls, floors, and other surfaces to confirm dryness levels.
Air Quality Testing: Assess the humidity levels in the air to ensure proper drying and ventilation.
Thermal Imaging: Use infrared technology to detect hidden moisture behind walls or under flooring.
Documentation: Keep detailed records of the inspection findings for future reference and insurance purposes.
Summary
Keep in mind that time is crucial when it comes to water damage. Following the top 10 tips for fast water removal solutions, you can minimize the impact, prevent further damage, and ensure a safe and clean environment.
Act swiftly, utilize professional equipment, and stay vigilant in monitoring moisture levels to align with a successful restoration process. Remember, quick action leads to prompt results in water removal.