It’s a coincidence that just as you’re gearing up for a weekend project, you discover unexpected messes around your home. You might feel overwhelmed, but a rapid home cleanup can be straightforward with the right approach. Start by pinpointing any issues, like water damage, and tackling them head-on. You’ll want to know key strategies that save time and ensure your space stays healthy. How do you efficiently manage the chaos without losing your mind? Let’s explore some essential tips that can transform your cleanup process.
Key Takeaways
- Quickly identify and address water damage sources to prevent further issues and facilitate efficient cleanup.
- Wear protective gear to ensure safety while cleaning, especially when dealing with potentially hazardous materials.
- Utilize fans and dehumidifiers to expedite drying and prevent mold growth in affected areas.
- Systematically clean and disinfect surfaces using appropriate solutions tailored to each material type.
- Consider hiring professionals for extensive cleanup tasks, especially when time is limited or hazardous materials are involved.
Identify the Source of Water
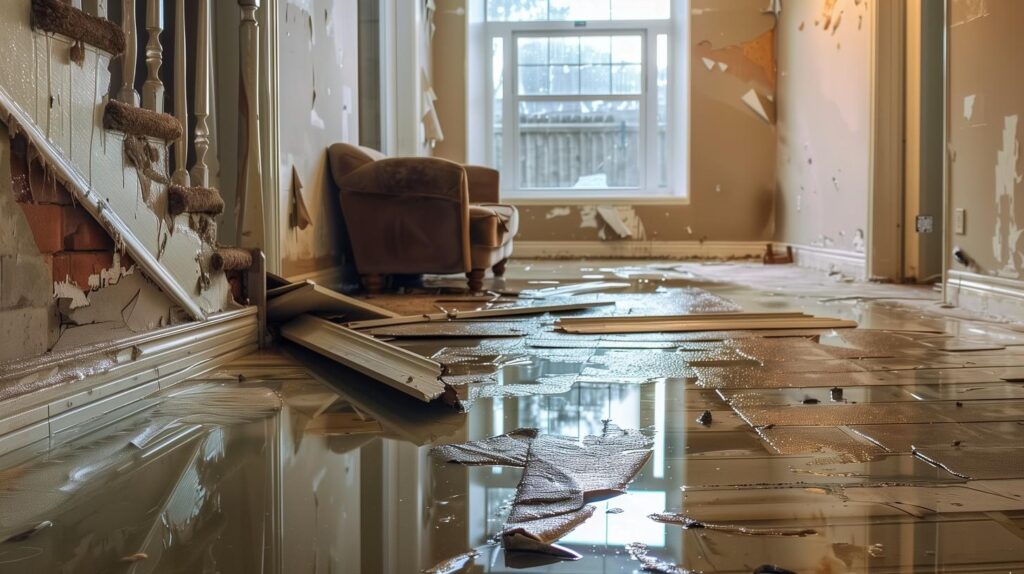
When tackling a water issue in your home, your first step is to identify the source of the problem. Start by looking for visible signs of water damage, such as stains on walls or ceilings, damp spots on floors, or warped materials. These clues can help you pinpoint where the leak might be.
Next, check common trouble areas like the kitchen, bathroom, and laundry room. Inspect under sinks, around toilets, and near appliances. If you spot any puddles or moisture, that’s a strong indicator of a leak. Remember, even small leaks can lead to significant water damage over time, so don’t ignore them.
For effective leak detection, you might need to look beyond what’s visible. Listen for unusual sounds, like dripping or running water that could signal a hidden leak. If you have access to your home’s plumbing system, inspect the pipes for any signs of wear or corrosion.
In some cases, water damage can originate from outside your home. Check your roof, gutters, and downspouts to ensure they’re functioning correctly. Water pooling around your foundation can also indicate issues that need addressing.
If you’re struggling to find the source, consider using moisture meters or infrared cameras, which professionals often use for leak detection. These tools can provide a clearer picture of hidden water issues.
Wear Protective Gear
When tackling home cleanup, choosing the right protective gear is essential for your safety.
Prioritize safety first to avoid injuries or exposure to harmful substances.
Regularly maintaining cleanliness keeps your space tidy and reduces the need for intensive cleanup later.
Choose Appropriate Gear
Wearing the right protective gear can make a significant difference in your home cleanup efforts. It not only keeps you safe but helps you tackle the mess more efficiently.
Start by selecting appropriate protective clothing. Long sleeves and pants can shield your skin from harsh cleaning supplies and any dirt or debris. If you’re dealing with particularly messy jobs, consider wearing an apron to protect your clothes.
Don’t forget about your feet—sturdy shoes with good grip can prevent slips and protect your toes from falling objects. Gloves are essential, too; they guard your hands against chemicals and irritants. Choose latex or rubber gloves that fit well for maximum comfort and protection.
For jobs that involve dust or hazardous materials, you might want to wear a mask or goggles. These items protect your eyes and lungs and help you focus on the task without distractions.
Prioritize Safety First
Safety should always be your top priority during home cleanup. To protect yourself effectively, wear the right protective gear. This includes gloves, masks, and goggles. These items shield you from dust, chemicals, and sharp objects, ensuring you’re safe while you work.
Before you start, familiarize yourself with safety protocols relevant to your cleanup tasks. If you’re dealing with hazardous materials or heavy items, understand the risks involved. Having a first aid kit handy is also a smart move; it prepares you for any minor injuries that might occur.
Emergency preparedness is crucial. Make sure you know the location of your fire extinguisher and how to use it. If you’re cleaning in a cluttered area, keep a clear path to exits in case of emergencies.
Involve your household members in these safety measures. Discuss the importance of wearing protective gear and following safety protocols together. This will foster a sense of community and ensure everyone is on the same page.
Maintain Cleanliness Regularly
Maintaining cleanliness regularly is essential for a tidy home and your health. Establishing a cleaning schedule can keep clutter at bay and ensure you’re not overwhelmed by mess.
Start small—set aside just 10-15 minutes each day for quick tidying tasks. You’ll be amazed at how these daily habits contribute to a more organized space.
Incorporate specific tasks into your schedule. For instance, dedicate Mondays to dusting, Wednesdays to vacuuming, and Fridays to bathroom cleaning.
By spreading tasks throughout the week, you make cleaning manageable and less daunting. It’s all about consistency!
Don’t forget to wear protective gear when necessary. Gloves and masks can safeguard you from harsh chemicals and allergens, making your cleaning routine safer and more efficient.
Plus, it sets a positive tone for your cleaning habits.
Remove Standing Water
Standing water can create a host of problems in your home, from attracting pests to fostering mold growth.
To ensure your living space remains safe and comfortable, it’s essential to act quickly and effectively. Here are three practical water removal techniques you can use for flood damage prevention:
- Use a Wet/Dry Vacuum: This is one of the most efficient tools for removing standing water. If you have a significant amount of water, start vacuuming as soon as possible to minimize damage.
Make sure to empty the vacuum regularly to maintain its suction power.
- Mop and Towels: For smaller puddles, grab a mop or some absorbent towels.
Begin mopping up what you can, then use the towels to soak up any remaining water. This method is simple but effective for quick cleanups.
- Sump Pump: If you experience frequent flooding, consider investing in a sump pump.
This device can help remove water from your basement or crawl space, preventing future issues.
Make sure to check the pump regularly to ensure it’s functioning properly.
Dry Affected Areas
Once you’ve removed standing water, it’s crucial to dry affected areas promptly to prevent further damage. Start by opening windows and doors to improve air circulation throughout your home. This simple step helps to create a cross-breeze, which can significantly speed up the drying process. If the weather’s humid, you might want to rely on a dehumidifier instead.
Using a dehumidifier effectively can make a world of difference. Set it up in the most affected areas and monitor its settings to ensure optimal performance. This device pulls moisture from the air, accelerating drying and reducing the risk of mold growth. If you have multiple rooms affected, consider placing smaller units in each space for maximum effect.
In tandem with your dehumidifier, use fans to further enhance air circulation. Position them strategically to push air across damp surfaces, promoting evaporation. Rotate the fans periodically to cover all areas and ensure nothing’s overlooked.
As you work, keep an eye out for any lingering moisture. Check corners, under furniture, and behind appliances—these spots are often missed but can harbor moisture and lead to future problems.
Time is of the essence, so stay focused and organized. By tackling the drying process head-on with these methods, you’ll restore your home and create a healthier living environment for yourself and your loved ones.
Clean and Disinfect Surfaces
After you’ve dried the affected areas, it’s time to clean and disinfect surfaces to eliminate any remaining contaminants. This step is crucial in ensuring a safe, healthy environment for you and your loved ones.
Use effective disinfecting techniques tailored to various surface materials to make the process efficient. Here’s how to tackle it systematically:
- Identify Surface Materials: Know what you’re working with. Different surfaces—like wood, tile, or fabric—require specific cleaning agents. For instance, avoid harsh chemicals on wood that can cause damage.
- Choose the Right Disinfectant: Select a disinfectant that’s effective against bacteria and viruses, and ensure it’s suitable for your surface materials. Check the labels for active ingredients and instructions for use. If you prefer natural options, vinegar, and baking soda can also work wonders on many surfaces.
- Clean Before Disinfecting: Start by wiping down surfaces with soap and water. This removes dirt and grime, allowing the disinfectant to work more effectively.
After cleaning, apply your disinfectant and let it sit for the recommended time to kill germs properly.
Monitor for Mold Growth
To keep your home safe, you need to monitor for mold growth, especially in high-risk areas like bathrooms and basements.
Regularly inspect these spaces for any signs of moisture or mold. If you find any, use effective cleaning solutions to tackle the problem before it spreads.
Identify High-Risk Areas
While you may not see mold immediately, identifying high-risk areas in your home is crucial to preventing its growth.
Mold thrives in damp, cluttered environments, so a proactive approach can save you from costly damage. Start with a thorough damage assessment, focusing on areas that might trap moisture.
Here are three key clutter hotspots to check regularly:
- Basements and Crawlspaces: These areas often retain humidity. Keep them well-ventilated and free of clutter to discourage mold.
- Bathrooms: Check around sinks, tubs, and toilets where water frequently accumulates. Ensure you’re cleaning any mildew and drying surfaces promptly.
- Kitchens: Look under sinks and behind appliances where spills may go unnoticed. Wipe down surfaces regularly and keep things organized to minimize moisture.
Regular Inspection Practices
Regularly inspecting your home for mold growth is essential in maintaining a healthy environment. Mold can thrive in damp areas, so routine checks are vital to catch potential issues early.
Start by examining high-risk areas, like bathrooms, kitchens, and basements, especially around sinks and windows. Look for any signs of moisture or discoloration on walls and ceilings.
During your home inspection, pay attention to hidden spots, such as behind appliances or under carpets. It’s also a good idea to monitor areas with poor ventilation. If you notice any musty smells, it could indicate mold growth, so investigate further.
Set a schedule for these inspections—monthly or quarterly works well for most homes. This proactive approach helps you spot mold early and fosters a sense of community and belonging as you share tips with friends and family.
If you find any mold, don’t hesitate to address it promptly. Keeping your home mold-free contributes to a healthier living space for you and your loved ones.
Effective Cleaning Solutions
After completing inspections for mold growth, it’s important to use effective cleaning solutions to eliminate any found mold and prevent future outbreaks.
You don’t need to reach for harsh chemicals—there are eco-friendly products and homemade cleaners that work just as well, and they’re better for your health and the planet.
Here are three solutions you can try:
- Vinegar: This natural disinfectant kills most mold species. Spray it undiluted on affected areas, let it sit for an hour, then wipe clean.
- Baking Soda: Mix a teaspoon of baking soda with water to create a paste. Apply it to mold spots, scrub, and rinse with water. It’s gentle and effective.
- Hydrogen Peroxide: This powerful antiseptic can be used in a 3% solution. Spray it on the mold, let it sit for about 10 minutes, and scrub off the remnants.
Seek Professional Help
When tackling a major home cleanup, consider enlisting professional help if the task feels overwhelming. Hiring professional services can significantly reduce your stress and save you valuable time. These experts bring not only manpower but also the right tools and techniques to handle any mess efficiently. Plus, their expert advice can help you create a more organized and functional space.
Here’s a quick guide to help you assess when you might need professional assistance:
| Situation | Why to Seek Help |
|---|---|
| Extensive clutter | Professionals can quickly sort and dispose of items. |
| Deep cleaning required | Experts have specialized equipment for thorough cleaning. |
| Time constraints | They can complete tasks faster, allowing you to focus on other priorities. |
| Hazardous materials present | Professionals are trained to handle dangerous substances safely. |
| Moving or renovations | They can help pack, unpack, or clean post-renovation messes. |
Summary
In the words of Benjamin Franklin, “An ounce of prevention is worth a pound of cure.” By quickly identifying the source of water damage, wearing protective gear, and thoroughly drying and disinfecting your home, you can effectively tackle cleanup. Keep an eye out for mold growth, and don’t hesitate to call in professionals if needed. A proactive approach not only restores your space but also protects your health and home for the future.