Isn’t it fascinating how quickly water can transform a space from welcoming to uninhabitable? When faced with water damage, you need to act promptly and methodically to minimize the impact. First, you’ll want to tackle the standing water, but that’s just the beginning. Once you’ve removed the excess moisture, the real challenge lies in drying out and sanitizing the affected areas to prevent long-term consequences. Understanding the best techniques can make a significant difference, especially when avoiding hidden hazards like mold growth. What’s the next critical step you should take?
Key Takeaways
- Start by identifying the water source and conducting a thorough damage assessment to prioritize cleanup efforts.
- Use wet/dry vacuums for shallow water extraction and submersible pumps for deeper standing water removal.
- Implement fans and high-capacity dehumidifiers to enhance drying and reduce humidity levels post-water removal.
- Clean and disinfect affected surfaces using appropriate agents based on contamination type, ensuring thorough sanitization.
- Engage certified mold remediation specialists to address any mold growth and discuss prevention strategies to avoid future damage.
Assessing Water Damage
When tackling water damage, the first step is to quickly assess the extent of the problem. Start by identifying the water source—whether it’s a broken pipe, a leaky roof, or flooding from a natural disaster. Pinpointing the source is crucial because it informs your immediate cleanup actions and helps prevent future incidents.
Next, conduct a thorough damage assessment in the affected areas. Look for visible signs like discoloration, warping, or mold, and pay attention to less obvious indicators, such as dampness in walls and floors. Use moisture meters to measure the humidity levels in materials, as this provides a more accurate understanding of the damage’s extent. Document your findings with photographs and notes, as this information will be valuable for insurance claims and future reference.
Additionally, consider the materials affected by the water intrusion. Different materials respond to water damage differently; for instance, drywall may need to be replaced, while hardwood floors may only require drying and refinishing. Take note of any electrical components that could pose a risk and need immediate attention.
Finally, assess the overall environment. Is there potential for further damage due to stagnant water or high humidity? Your damage assessment should guide your next steps in the cleanup process, ensuring a focused and effective approach.
Safety Precautions
Before you begin cleanup, it’s crucial to wear appropriate protective gear, including gloves, masks, and eye protection, to shield yourself from contaminants.
Additionally, ensure that all electrical sources are safely disconnected to prevent shocks or further damage.
Following these safety precautions sets the foundation for an effective and secure water damage restoration process.
Wear Protective Gear
Ensuring your safety during water damage cleanup requires wearing the appropriate protective gear.
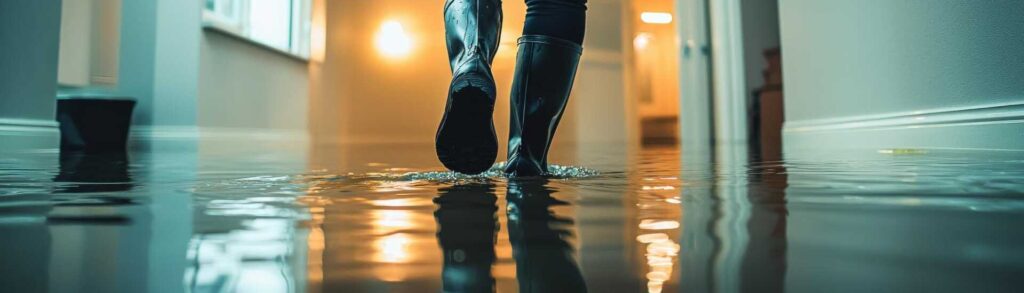
You’ll want to start with durable, waterproof boots that can handle standing water and prevent slips. These boots should have good traction to keep you stable on wet surfaces.
Next, consider protective clothing made from impermeable materials to shield your skin from contaminants often found in floodwaters, such as bacteria or chemicals.
Don’t forget gloves—opt for heavy-duty, long-sleeved options that extend to your forearms. They’ll safeguard your hands from sharp objects and hazardous substances.
A mask or respirator is also essential, especially if you’re dealing with mold or airborne particles. This safety equipment will help you breathe easier and avoid respiratory issues.
Additionally, eye protection is crucial; goggles can prevent any splashes from reaching your eyes during the cleanup process.
Wearing the right protective gear enhances safety and fosters a sense of belonging among those tackling similar challenges.
Ensure Electrical Safety
As you begin the cleanup process, it’s critical to prioritize electrical safety to prevent potentially life-threatening accidents. Start by ensuring all power sources in affected areas are turned off. This includes unplugging appliances and switching off circuit breakers connected to wet spaces.
Conduct a thorough electrical inspection of the area before re-entering. Look for frayed wires, waterlogged outlets, or any signs of electrical damage.
Next, consider the importance of circuit safety. If you notice any issues during your inspection, don’t hesitate to call a qualified electrician. They can assess the condition of your wiring and determine if repairs are needed. Always remember that water and electricity can be a dangerous combination, so err on the side of caution.
While cleaning, use battery-operated equipment whenever possible to avoid any risks associated with plugged-in devices. If you must use electrical tools, ensure they’re rated for wet conditions and are properly grounded.
Lastly, keep a safe distance from any standing water until you’re confident that the electrical system is safe. By taking these precautions seriously, you’re protecting yourself and ensuring a safer environment for everyone involved in the cleanup.
Removing Standing Water
Standing water can lead to significant damage if not addressed promptly. It’s crucial to act swiftly to minimize the effects of water damage. Begin the water extraction process by assessing the depth and extent of the standing water. Depending on the volume, you might need different equipment for effective removal.
Here’s a quick guide to the tools you might use:
| Tool | Usage | Considerations |
|---|---|---|
| Wet/Dry Vacuum | Ideal for shallow water | Ensure it’s rated for liquid use |
| Submersible Pump | For deeper standing water | Check for proper power supply |
| Sump Pump | Permanent solution for basements | Regular maintenance is essential |
Once you’ve selected the appropriate tools, start by using a wet/dry vacuum for any areas with shallow water. This method allows for immediate water extraction without causing additional damage. For deeper water, a submersible pump is your best bet. Make sure to position the pump at the lowest point to maximize efficiency.
While using pumps, monitor the water level continuously. As the water recedes, you can switch to a wet/dry vacuum to capture any remaining moisture. Remember to wear protective gear, including gloves and boots, to ensure your safety during the process. By following these steps methodically, you’ll effectively remove standing water and mitigate further damage to your property.
Drying and Dehumidifying
After removing standing water, the next critical step is drying and dehumidifying the affected areas. This process is essential to prevent structural damage and mold growth.
Start by assessing the humidity levels in the environment. If it’s high, your focus should be on effectively reducing moisture content.
Utilize air circulation techniques to enhance the drying process. You can employ fans strategically placed around the area, ensuring they direct airflow towards wet surfaces. This promotes evaporation and speeds up drying. Additionally, opening windows can help if the outdoor air is less humid, allowing for better air exchange.
Next, consider your dehumidifier options. A high-capacity dehumidifier is a powerful tool that can significantly lower humidity levels. Choose a model that suits the size of the affected area. For smaller spaces, portable dehumidifiers work well, while larger spaces may require a commercial unit. Run the dehumidifier continuously until the humidity level drops to around 30-60%.
Monitor the progress regularly. Using a hygrometer, check the humidity levels to ensure they’re steadily decreasing. This step is crucial because lingering moisture can lead to long-term issues like mold and mildew.
Finally, be patient. Drying and dehumidifying can take time, but thoroughness here will save you from more extensive repairs later.
Cleaning Contaminated Surfaces
When cleaning contaminated surfaces, you need to start by assessing the level of contamination present.
This evaluation will guide your choice of effective disinfection methods to ensure thorough sanitization.
Assessing Surface Contamination
Before initiating any cleanup efforts, it’s essential to assess surface contamination thoroughly to ensure effective remediation. Start by identifying potential contamination sources, such as sewage, chemicals, or mold, as these will dictate your approach.
Conduct surface testing to determine the type and level of contaminants present. This may involve swabbing surfaces and using specialized kits to analyze samples.
Once you’ve identified contamination sources, categorize the areas based on their risk level. High-risk zones require immediate attention, as they can pose health hazards.
Use visual inspections to complement your surface testing; look for discoloration, stains, or unusual odors, which can indicate hidden contamination.
Document your findings meticulously, as this information is crucial for planning your remediation strategy. Include details about the types of contaminants, affected materials, and any necessary safety precautions.
By conducting a thorough assessment, you will protect yourself and others and ensure that your cleanup efforts are targeted and efficient.
Effective Disinfection Methods
To effectively disinfect contaminated surfaces, you must choose appropriate cleaning agents and techniques tailored to the specific contaminants identified during your assessment. Understanding the right disinfection agents is key to ensuring a hygienic environment. Here’s a structured approach to help you select effective sanitization techniques.
| Contaminant Type | Recommended Disinfection Agents |
|---|---|
| Bacteria | Bleach (sodium hypochlorite) |
| Viruses | Hydrogen peroxide |
| Mold and Mildew | Vinegar or specialized mold cleaners |
| Heavy Soils | Detergent-based cleaners |
| General Sanitization | Quaternary ammonium compounds |
Start by thoroughly cleaning the surface to remove any dirt or debris, as this enhances the effectiveness of your disinfection agents. Apply your chosen agent according to the manufacturer’s instructions, ensuring adequate contact time for optimal efficacy. After disinfecting, rinse the surface if required and allow it to dry completely. Always wear protective gear to safeguard against exposure. By following these methodical steps, you’re ensuring a safer space for yourself and others.
Inspecting for Mold
Although you mightn’t see mold right away, inspecting for it after water damage is crucial to preventing further issues. Mold growth can begin within 24 to 48 hours of moisture exposure, so you need to act quickly.
Start your inspection in areas that are prone to dampness, such as basements, bathrooms, and around windows. Look for visible signs of mold, including black, green, or white patches on surfaces.
Next, check hidden spaces where moisture might linger. This includes behind drywall, under carpets, and within HVAC systems. Use a moisture meter to assess humidity levels in these areas. A reading above 60% indicates a potential mold risk, and you should take immediate action.
Don’t forget to examine your belongings too. Furniture, clothing, and paper products can harbor mold spores if they were affected by water.
If you notice any musty odors, that’s often a telltale sign of mold presence, even if it’s not immediately visible.
Professional Mold Removal
When dealing with mold after water damage, professional mold removal is often the most efficient and effective solution. Engaging a certified mold remediation specialist ensures that you’re addressing the issue comprehensively, employing advanced mold removal techniques tailored to your specific situation.
These experts begin with a thorough assessment of the affected areas, utilizing tools like moisture meters and thermal cameras to detect hidden mold growth.
Once identified, they implement targeted removal methods, which may include HEPA vacuuming, containment strategies to prevent spore dispersion, and chemical treatments that eliminate mold at its source.
Professionals are trained to handle hazardous materials safely, ensuring both your health and property remain protected throughout the process.
After removal, these specialists will likely discuss mold prevention strategies with you. This could involve recommending upgrades to your home’s ventilation, improving drainage systems, or applying anti-microbial sealants to vulnerable areas.
They’ll help you understand how moisture control and regular inspections can significantly reduce the likelihood of future mold outbreaks.
In short, investing in professional mold removal not only resolves your current issue but also fosters a healthier living environment.
Preventing Future Damage
How can you effectively prevent future water damage in your home? Implementing robust waterproofing techniques and committing to regular maintenance are essential.
Start by thoroughly inspecting your roof for any missing shingles or leaks. If you find any, repair or replace them immediately. Consider applying a waterproof sealant to your roof to provide an extra layer of protection.
Next, focus on your gutters. Make sure they’re clean and free from debris, allowing water to flow freely away from your home. Installing gutter guards can help reduce the frequency of cleaning and prevent clogs. Additionally, ensure downspouts direct water at least six feet away from your foundation.
Inspect your basement and foundation regularly. Look for cracks or signs of moisture intrusion. If you find any issues, employ waterproofing techniques such as applying a waterproof membrane or using a sump pump to manage excess water.
Don’t forget about plumbing systems. Regularly check for leaks in pipes and fixtures, as even minor drips can lead to significant damage over time. Consider scheduling routine professional inspections to catch issues early.
Lastly, maintain your landscaping. Ensure that the grading around your home slopes away from the foundation, preventing water from pooling near your walls.
Wrap-Up
In the end, you might find it ironic that just when you think you’ve conquered water damage, it can strike again. By diligently assessing, removing standing water, and ensuring thorough drying and sanitization, you minimize the risk of recurrence. However, neglecting ongoing vigilance could invite mold back into your life. So, while you may feel relieved after the cleanup, remember that consistent prevention is your true ally against the relentless nature of water damage.